

Total Knee Arthroplasty Surgical Video
At Plexus Surgical Video Productions we have produced many video programs on total knee arthroplasty. In this slideshow, we thought you might like to see the salient steps of a TKA procedure as demonstrated from two roving camera angles, using two jib or boom arms, with specialized lighting designed specifically for shooting surgical procedures.

Here is a series of photo stills taken from a total knee arthroplasty procedure shot by Plexus Surgical Video Productions.

A paramedian incision is made so that the patella can be deflected laterally without violation to the patellar tendon.

The patella is measured for thickness so the accuracy of the bony cut can be maintained which optimizes patellar component gliding over the femoral component without impeding flexion.

The patellar osteotomy is made using an oscillating saw with a clamp that guides the depth of the cut.

Three patellar peg holes are drilled to seat the patellar component later.

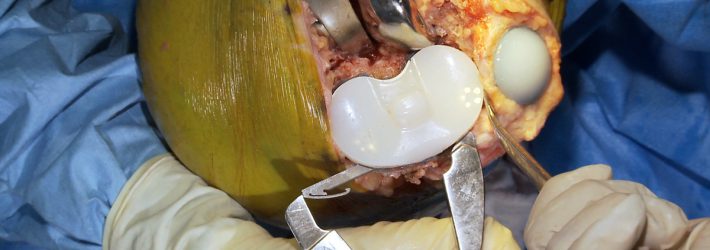
A narrow cobra retractor is used to leverage the tibial plateau forward so as to gain exposure for posterior horn meniscus removal. Not the patellar trial component is placed and left in place in order to protect the freshly cut bony surface during the remainder of the surgical maneuvers.

Tibial osteotomy measurements are obtained by referencing the talus at the distal end of the leg with the feeler gauge seen here so that accurate cant and depth of the osteotomy can be made.

Tibial osteotomy measurement is obtained by referencing the deepest part of the lateral tibial plateau. In all total knee arthroplasty video productions two camera angles must be used at all times to gain the important perspective to demonstrate the teaching points of the procedure.

With the tibial cut made, we can see the even, flat surface from the overhead camera angle.

The tibial tray diameter jig is used to determine the appropriate size of the tibial component. This too is used by referencing the talus so the axis of the tibial tray is correct.

Tibiotalar joint centralization is critical for accurate placement of the tibial component. This reference helps make certain there will be adequate slope to component placement.

Again, tibial component slope determination is best seen with two camera angles, both with jib or boom arms, one overhead and the other from a lower angle, so that all the details of total knee arthroplasty can be captured.

The femoral AP cut jig is placed by first referencing the femoral canal with a T-handle rod.

The femoral AP cut jig is placed by first referencing the femoral canal with a T-handle rod. This aligns the osteotomy with the axis of the femur.

Extension alignment testing is conducted with a spacer to verify that the AP femoral cuts have been made accurately.

Extension adequacy test can be seen from this AP camera view demonstrating that full extension is achieved. It is important that the surgical video crew does not slow the surgeon down so using two cameras is essential so that important teaching point angles can be captured without delay.

Determining anterior and posterior femoral osteotomies is conducted using a jig placed on the femoral surface.

The posterior osteotomy is made with an oscillating saw.

Osteotomy fragments are removed using an osteotome. Note the angle cuts have been made at this stage as well.

The trial femoral component is placed to check alignment, flexion and extension of the leg.

A leg extension test is done to determine that full extension is achieved.

Tibial tray rotation alignment is determined again by referencing the axis of the tibia with the central portion of the tibiotalar joint. Pins will be placed to stabilize this jig and then a broach will be used to make that centralizing anchor footprint for the tibial component.

The tibial tray broach is then used to establish rotation stability for the tibial component.

Cement anchor holes are made with a bur so that the cement embeds into the bone, adding stability to the components.

Cement is applied to bony surfaces and the components are placed.

In a lower camera angle than the overhead, cementation is conducted in total knee replacement surgery. Note the Simms tip suction placed in a bony portal to help evacuate blood from the trabecular bone as well as coax cement infiltration.

Excess cement is removed from all components in total knee replacement before it fully dries.

From the lower camera angle the viewer can see the details of how the tibial tray is locked into the tibial component.

In this overhead camera angle the tibial tray is locked into place. Using at least two cameras for most surgical procedures is essential. Also note the evenness of the lighting. This is obtained with the aid of specialized lights commonly called "sun-guns" in the video industry. However these lights must be used skillfully with other camera techniques in order to get this kind of shot. Visit Plexus.tv for more details.
The goal of all surgical video production is to capture every detail of the procedure in a manner that the surgeon would want to see demonstrated. It is critical that the surgical video crew knows how to get the best shots, knows the procedure, knows the correct camera angle, and can anticipate the surgeon’s next step, because typically the surgeon is paying attention to the patient and not the camera angle. Therefore it helps using a video crew with a surgical background. Shooting surgical video is one of the toughest kinds of video production. Knowing the environment, being at home in the operating room, and knowing how to communicate details with the surgeon always produces a better surgical video program.

